Orange is a cool colour.
Orange is also a colour which can make anything look god awful if you use too much of it, use it in the wrong place, or with the wrong colour etc... I was seriously worried before I started painting that the my choice of orange on black was going to turn out kind of Hallo-weenish, but I went ahead anyways and this is where my disregard for my own instincts have gotten me
What has been painted:
Frame - orange
swingarm - black
front caliper - orange/black
back brake stay - orange
etc...
So, after one coat a week ago (FYI: it really is best to wait the recommended time periond on the spray can), and another today here is how the frame looks

Not bad eh?
I also decided it was time to finish up the exhaust pipes and ready them for wrapping. Here is how they look before (above) and after (below) being sprayed with a can of Mastercraft High Temp Manifold paint.

As you can see below, when I got the CL360 exhaust pipes one of the pipes had a flange spot welded onto the end of it which I presume held the muffler on. To remove this, I got the hacksaw out and cut it off as neatly as I could.
Before (sorry, this is the only picture I could find of it)

After

Before I sign off, I just want to explain my reason for painting the frame orange. When I saw how well the orange came out on the first few pieces (see previous post) I really wanted to incorperate more of it into the bike. I went to the KTM website where I found my inspiration, the KTM superduke 990 Rebel. I'm just hoping mine will turn out looking half as good.

Orange is also a colour which can make anything look god awful if you use too much of it, use it in the wrong place, or with the wrong colour etc... I was seriously worried before I started painting that the my choice of orange on black was going to turn out kind of Hallo-weenish, but I went ahead anyways and this is where my disregard for my own instincts have gotten me
What has been painted:
Frame - orange
swingarm - black
front caliper - orange/black
back brake stay - orange
etc...
So, after one coat a week ago (FYI: it really is best to wait the recommended time periond on the spray can), and another today here is how the frame looks
Not bad eh?
I also decided it was time to finish up the exhaust pipes and ready them for wrapping. Here is how they look before (above) and after (below) being sprayed with a can of Mastercraft High Temp Manifold paint.
As you can see below, when I got the CL360 exhaust pipes one of the pipes had a flange spot welded onto the end of it which I presume held the muffler on. To remove this, I got the hacksaw out and cut it off as neatly as I could.
Before (sorry, this is the only picture I could find of it)
After
Before I sign off, I just want to explain my reason for painting the frame orange. When I saw how well the orange came out on the first few pieces (see previous post) I really wanted to incorperate more of it into the bike. I went to the KTM website where I found my inspiration, the KTM superduke 990 Rebel. I'm just hoping mine will turn out looking half as good.


 I also managed to do a final clean up of the frame and I got the wheels to more or less shine.
 Now yesterday I took some time and prepped a whackload of parts for painting, it was raining out so I figured there was nothing else to do. Today, I went out and bought a can of Dupli-color Engine enamel. One low gloss black and the other Chevy orange. The result has so far been fantastic! I am really happy with the way the orange came out, especially since it was almost neon when I was painting the parts. The only problem I had was that the spray can says to bake the parts at 300 F. So after talking with my folks they allowed me to use the oven in the kitchen (dont ask WHY they let me use it, I know I wouldnt let my kid do that).


 With these pieces out of the way, I am now left with the frame and gas tank and engine side covers to paint, the exhaust needs fixing up, the front brakes need rebuilding and new tires and its more or less ready to ride. I make it sound so easy, but in reality I spent 8 or so hours outside today just painting! In the end it will be worth it (I think).
 I began hacking away at it until it looked like this.
 All that is left to be done now is to drill two holes in the bottom of the cowl and drill two holes in the fender bracket on the bike (circled above in red) so that they match up with the original mounting holes on the cowl and hope a CJ360 seat pan will fit on the stock seat hinges and thats it for fabrication. By the way, If anyone would be able to donate a CJ360 seat pan I would really appreciate it. If it needed to be shipped I would cover the cost.
 At this point, I have decided to take the somewhat easier way out and make the seat without cutting up the back end of the frame. I did a terrible job of cutting up the seat pan and I have decided to buy a CJ360 seat pan, and cut the middle out to shorten it. It should look good once I've gotten the new seat pan on there.

 Oh, and by the way, NEVER buy ANY powertool accessory from princess auto. THIS is what happened when I tried to cut through the seat pan. lousy thing could have killed me! When it happened I ended up tossing it in the garden bed, and while it was knawing away at the daffodils I ran for the extension cord plug! Good times!


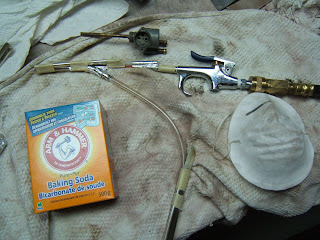 Overall, It worked alright. I would not recommend doing this on anything other than carbs and petcocks, It simply is not powerful enough and from what I have heard for some reason paint does NOT adhere to surfaces that have been soda blasted. Anyways, here is the before and after of the petcock I cleaned.
 Today I was able to get a few coats of primer and paint down onto some parts. The engine brackets, swing arm seals, the brake rod, and gauges all got a good few coats of black, while the rear brake stay, and the seat cowl were primed. The cowl needs a number of cracks filled that I hadn't noticed before, and the brake stay needs to be cleaned. To me, the paint process is a BIG sign that the project is finally moving toward completion.
 Since the day I got the bike I knew the whole exhaust needed replacing. Finally, after a number of weeks of searching I managed to get my hands on a pair of CL360 exhaust pipes.
 They are "Scrambler" style meaning that they run along the side of the bike, above the crankcase. More about the pipes later once they are delivered. I also managed to get a set of rearset levers which will allow me to move the footpegs backwards, making for a more comfortable, sporty riding position.
 Next we have the frame. Although nothing has yet been cut, stripped or repainted, I have managed to clean it which was a big task in itself.
  At the same time, I took a stab at cleaning the engine. The results were not as spectacular and it will need another cleaning. In order to clean the engine off using a pressure washer, I had to seal the exhaust ports somehow. My solution was to pack the ports with a rag, then sandwich a plastic bag between the cylinder block and the exhaust flange. I did something similar with the intake ports, simply packing and wrapping with a plastic bag. Its not a perfect solution but it works.

 and After:
  Finally, here is a picture of what the PO did to seal the tachometer cable port on the rocker cover. He probably thought he was being a genious, I think otherwise.
 A replacement rocker cover has already be purchased and is awaiting cleaning and intstallation. In the next few days I will have pictures of the seat cowl I have been working on, and I must say I am quite proud of it. I will also try my hand at a bit of soda blasting. Don't worry if you've never heard about it before, I will cover it in the next post.

 Not much of it is left. The carburetors Have been disassembled and are awaiting a good cleaning once the weather warms up (carb cleaner is VERY hazardous and should be used somewhere well ventilated, such as outside). Overall, the jets were rather gummed up, certainly enough to make the bike run rough. In hindsight, I wish I had taken the carburetors off before I began the disassembly, it would have given me a better idea of how strong the engine is really running. Now I have to wait until reassembly!

 I also noticed when I disassembled the front end of the bike that the forks are leaking from their screws at the bottom, which means a fork rebuild is now unavoidable (big $$$).
 On the positive side of things, I have managed to order a number of replacement parts which will be featured in the next update. And, now that the bike is completely apart, I can begin cleaning and stripping the paint off the frame, tank etc... and get ready for painting!
 As you can see, I've been quite busy in the past few days. Let me fill you in on my progress. On Thursday, I decided to take a stab at draining the fuel out of the tank. To do this, I first needed to take the fuel tubes going from the tank to the carbs off. After spending 10 minutes trying to pry the tubes off the tank, I decided to simply syphon the fuel using a piece of plastic conduit piping. Long story short, I ended up with more gas in my mouth than in the bottle. I eventually managed to get the gas lines off and filled up about 4, 2 litre pop bottles with rusty old gas. Hurrah, the tank can be removed! Next, I decided to remove the wiring harness, along with the headlamp which has still yet to be opened. Overall, the electrical wasn't much of a problem. Just clipped the zip ties holding the wires to the frame, took of the ignition coils off, and gave it a firm pull. This is what it looked like:
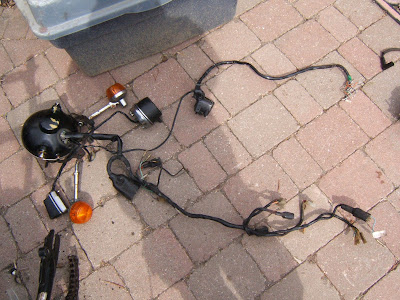 After a few days of struggling with the headlamp screws, I just decided pull out as many wires out from the hole in the back that I could. They all ended up removed safe and sound which means I didn't need to open the headlamp after all! This is what the electrical looks like when spread out on my patio:
 Next, I turned my attention towards the carburetors. My first attempt at getting them detached from the engine had me giggling and wiggling the damn things expecting them to simply slide off the rubber gaskets that connect the carbs to the engine. After that failed, I went for broke and grabbed the CROWBAR. The carbs didn't put up much of a fight after that I just had to disconnect the throttle cables and I was done. I then opened up the clutch cover, removed the front sprocket, chain and shift lever, and disassembled the rear brake assembly. A note to anyone who ever decides to restore a motorcycle, make sure you replace the stock engine bolts with hex bolts for the simple reason that Philips head bolts strip easily compared to hex or even Allen head bolts.


