Alright, so after a full week of tinkering with the bike, this is what is left on the bike. As you can see, I've been quite busy in the past few days. Let me fill you in on my progress. On Thursday, I decided to take a stab at draining the fuel out of the tank. To do this, I first needed to take the fuel tubes going from the tank to the carbs off. After spending 10 minutes trying to pry the tubes off the tank, I decided to simply syphon the fuel using a piece of plastic conduit piping. Long story short, I ended up with more gas in my mouth than in the bottle. I eventually managed to get the gas lines off and filled up about 4, 2 litre pop bottles with rusty old gas. Hurrah, the tank can be removed! Next, I decided to remove the wiring harness, along with the headlamp which has still yet to be opened. Overall, the electrical wasn't much of a problem. Just clipped the zip ties holding the wires to the frame, took of the ignition coils off, and gave it a firm pull. This is what it looked like:
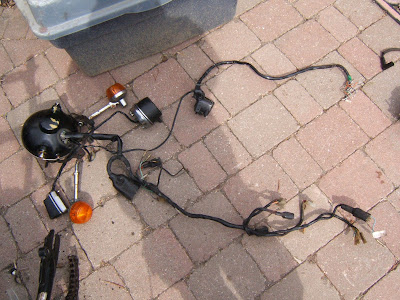 After a few days of struggling with the headlamp screws, I just decided pull out as many wires out from the hole in the back that I could. They all ended up removed safe and sound which means I didn't need to open the headlamp after all! This is what the electrical looks like when spread out on my patio:
 Next, I turned my attention towards the carburetors. My first attempt at getting them detached from the engine had me giggling and wiggling the damn things expecting them to simply slide off the rubber gaskets that connect the carbs to the engine. After that failed, I went for broke and grabbed the CROWBAR. The carbs didn't put up much of a fight after that I just had to disconnect the throttle cables and I was done. I then opened up the clutch cover, removed the front sprocket, chain and shift lever, and disassembled the rear brake assembly. A note to anyone who ever decides to restore a motorcycle, make sure you replace the stock engine bolts with hex bolts for the simple reason that Philips head bolts strip easily compared to hex or even Allen head bolts.
As you can see, I've been quite busy in the past few days. Let me fill you in on my progress. On Thursday, I decided to take a stab at draining the fuel out of the tank. To do this, I first needed to take the fuel tubes going from the tank to the carbs off. After spending 10 minutes trying to pry the tubes off the tank, I decided to simply syphon the fuel using a piece of plastic conduit piping. Long story short, I ended up with more gas in my mouth than in the bottle. I eventually managed to get the gas lines off and filled up about 4, 2 litre pop bottles with rusty old gas. Hurrah, the tank can be removed! Next, I decided to remove the wiring harness, along with the headlamp which has still yet to be opened. Overall, the electrical wasn't much of a problem. Just clipped the zip ties holding the wires to the frame, took of the ignition coils off, and gave it a firm pull. This is what it looked like:After a few days of struggling with the headlamp screws, I just decided pull out as many wires out from the hole in the back that I could. They all ended up removed safe and sound which means I didn't need to open the headlamp after all! This is what the electrical looks like when spread out on my patio:Next, I turned my attention towards the carburetors. My first attempt at getting them detached from the engine had me giggling and wiggling the damn things expecting them to simply slide off the rubber gaskets that connect the carbs to the engine. After that failed, I went for broke and grabbed the CROWBAR. The carbs didn't put up much of a fight after that I just had to disconnect the throttle cables and I was done. I then opened up the clutch cover, removed the front sprocket, chain and shift lever, and disassembled the rear brake assembly. A note to anyone who ever decides to restore a motorcycle, make sure you replace the stock engine bolts with hex bolts for the simple reason that Philips head bolts strip easily compared to hex or even Allen head bolts.Although the picture above appears to be horribly dirty and thus poorly maintained, this is not the case. The grease off of the chain has actually coated the bare metal, and protected it from the elements. But I still have to clean it...
I also have a new set of triple trees to add to my parts list. This is what I discovered yesterday:
Ya, that crack shouldn't be there. It seems as if this project just won't stop burning holes in my wallet!
This is what is left to remove:
- Rear Swing arm
- Engine
- Front forks
- Front wheel
After those things are done, I can begin focusing on the repairing stage of this project, including fixing the dents in the tank, getting the engine and front forks rebuilt, and paint. Hmm... it all seems so easy on paper...


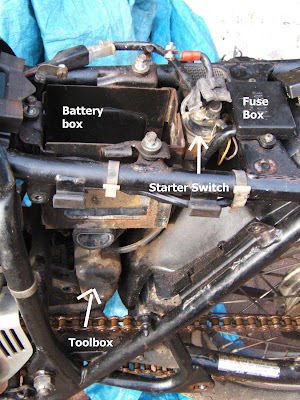 Only one thing troubled me about this part of the tear down. When I took off the toolbox I was greeted by the signal blinker switch, and the silicon rectifier which looked a bit off. I took a look through my CB 360 Shop manual and found someone, for some unknown reason, decided to relocate these parts from their usual position (beside the starter switch) to where I found them. I will try to get to the bottom of this and figure out what motivated the PO (previous owner) to do such a thing.
 After that, I tackled the front brake, stopping short of actually removing the calipers themselves. I also managed to take the front fender off.
  The only thing I didn't get around to was draining the fuel out of the carburateurs and tank. I suppose I will leave that for later.
 Posts
Posts

