TEAR DOWN IS FINISHED!
Yes, that's right, the bike is completely apart. Since the last post, the stubborn swing arm was removed (with the help of a hammer), the engine was then removed from the frame followed by the front wheel and forks. All the random nuts and bolts have been organised according to their location (forks, frame and engine) and been brought inside for cleaning. Here is a picture of the bike as of today: Not much of it is left. The carburetors Have been disassembled and are awaiting a good cleaning once the weather warms up (carb cleaner is VERY hazardous and should be used somewhere well ventilated, such as outside). Overall, the jets were rather gummed up, certainly enough to make the bike run rough. In hindsight, I wish I had taken the carburetors off before I began the disassembly, it would have given me a better idea of how strong the engine is really running. Now I have to wait until reassembly!

 I also noticed when I disassembled the front end of the bike that the forks are leaking from their screws at the bottom, which means a fork rebuild is now unavoidable (big $$$).
 On the positive side of things, I have managed to order a number of replacement parts which will be featured in the next update. And, now that the bike is completely apart, I can begin cleaning and stripping the paint off the frame, tank etc... and get ready for painting!
Not much of it is left. The carburetors Have been disassembled and are awaiting a good cleaning once the weather warms up (carb cleaner is VERY hazardous and should be used somewhere well ventilated, such as outside). Overall, the jets were rather gummed up, certainly enough to make the bike run rough. In hindsight, I wish I had taken the carburetors off before I began the disassembly, it would have given me a better idea of how strong the engine is really running. Now I have to wait until reassembly! I also noticed when I disassembled the front end of the bike that the forks are leaking from their screws at the bottom, which means a fork rebuild is now unavoidable (big $$$). On the positive side of things, I have managed to order a number of replacement parts which will be featured in the next update. And, now that the bike is completely apart, I can begin cleaning and stripping the paint off the frame, tank etc... and get ready for painting!Stay tuned as I anticipate a large amount of progress in the next two weeks!


 As you can see, I've been quite busy in the past few days. Let me fill you in on my progress. On Thursday, I decided to take a stab at draining the fuel out of the tank. To do this, I first needed to take the fuel tubes going from the tank to the carbs off. After spending 10 minutes trying to pry the tubes off the tank, I decided to simply syphon the fuel using a piece of plastic conduit piping. Long story short, I ended up with more gas in my mouth than in the bottle. I eventually managed to get the gas lines off and filled up about 4, 2 litre pop bottles with rusty old gas. Hurrah, the tank can be removed! Next, I decided to remove the wiring harness, along with the headlamp which has still yet to be opened. Overall, the electrical wasn't much of a problem. Just clipped the zip ties holding the wires to the frame, took of the ignition coils off, and gave it a firm pull. This is what it looked like:
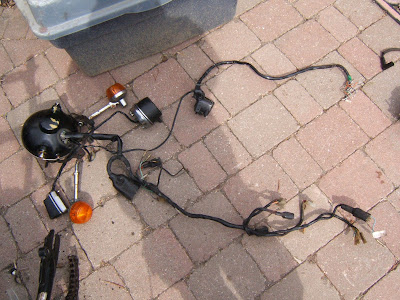 After a few days of struggling with the headlamp screws, I just decided pull out as many wires out from the hole in the back that I could. They all ended up removed safe and sound which means I didn't need to open the headlamp after all! This is what the electrical looks like when spread out on my patio:
 Next, I turned my attention towards the carburetors. My first attempt at getting them detached from the engine had me giggling and wiggling the damn things expecting them to simply slide off the rubber gaskets that connect the carbs to the engine. After that failed, I went for broke and grabbed the CROWBAR. The carbs didn't put up much of a fight after that I just had to disconnect the throttle cables and I was done. I then opened up the clutch cover, removed the front sprocket, chain and shift lever, and disassembled the rear brake assembly. A note to anyone who ever decides to restore a motorcycle, make sure you replace the stock engine bolts with hex bolts for the simple reason that Philips head bolts strip easily compared to hex or even Allen head bolts.


 Posts
Posts

