Thursday, May 7, 2009
New feature! Honda CB360 Documentation archive
So, I have decided to add a list of useful documents and links concerning the CB360. First to be added was a direct downlod for the Honda CB CL CJ 250 and 360 Shop Manual. I found this very useful and I hope you can get some use out of it too!
Tuesday, May 5, 2009
LED tail lights and turn signals
I just recieved my turn signals and tail light in the mail, and as you can see, some assembly will be required! I decided to go with the LED strips commonly found on ebay because I wanted to be able to place the lights underneath the lip of the seat cowl (the picture below explains it better). Apparently it will not take much to convert normal bulb lights to LED, all you need is a LED flasher relay to replace your stock one, this can also be found on ebay.
Advantages:
- Compact
- Flexible
- Bright
- Look cool and give the bike a custom appearance
Disadvantages:
- May or may not pass safety inspection AKA not DOT approved
- Need to buy a new flasher relay
- Pointless if your current lights work fine
Heres a quick Video of the lights hooked up to a 9 volt battery (rated for 12V use)
And here are some pictures of what they look like in daylight.


I plan to put the brake light underneath the lip of the cowl and the turn signals positioned vertically on either side.

Sunday, May 3, 2009
Clean, Paint, Purchase
Alright, So Three big things have happened recently in the build. The first is about my attempt at making my own soda blaster. Next I have an update from the paint department, and finally, I managed to find some more junk on the web to put on the bike.
Last weekend I decided I was fed up with washing parts, then rinsing then drying them only to find the stuff was still dirty, so I went in a different direction and searched the web for a better way to clean parts that involved less work. What I found was a how-to on building your own soda blaster. You can click here to find out more about what it is and how to build one.
Here is my home made soda blaster: 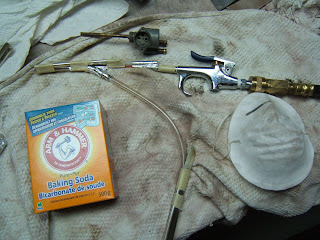 Overall, It worked alright. I would not recommend doing this on anything other than carbs and petcocks, It simply is not powerful enough and from what I have heard for some reason paint does NOT adhere to surfaces that have been soda blasted. Anyways, here is the before and after of the petcock I cleaned.
Overall, It worked alright. I would not recommend doing this on anything other than carbs and petcocks, It simply is not powerful enough and from what I have heard for some reason paint does NOT adhere to surfaces that have been soda blasted. Anyways, here is the before and after of the petcock I cleaned.
 Today I was able to get a few coats of primer and paint down onto some parts. The engine brackets, swing arm seals, the brake rod, and gauges all got a good few coats of black, while the rear brake stay, and the seat cowl were primed. The cowl needs a number of cracks filled that I hadn't noticed before, and the brake stay needs to be cleaned. To me, the paint process is a BIG sign that the project is finally moving toward completion.
 Since the day I got the bike I knew the whole exhaust needed replacing. Finally, after a number of weeks of searching I managed to get my hands on a pair of CL360 exhaust pipes.
 They are "Scrambler" style meaning that they run along the side of the bike, above the crankcase. More about the pipes later once they are delivered. I also managed to get a set of rearset levers which will allow me to move the footpegs backwards, making for a more comfortable, sporty riding position.
As far as my time schedule goes, I really do not have any clue how much longer it will take to get this bike back on the road. For the time being though, I'll keep myself busy cleaning, painting and purchasing stuff for the bike.
Next week should see the arrival of the exhaust, and the beginning steps of mocking up the bike (something I should have done BEFORE I had torn it to pieces). Stay tuned!
Subscribe to:
Posts (Atom)

